|
Posted by decoud on
12-20-2008
|
|
fiogf49gjkf0d I am constructing a set of 400 Hz resin-bonded sand horns and have been thinking about the best way of coupling the S2 to them. I can't find anything off the shelf that is 2.620 x 16 tpi, and none of the people with lathes I know have imperial kit to make a suitable threaded collar. I know Jessie had something made especially for his - presumably at high cost - but are there any other solutions?
|
|
|
|
Posted by Romy the Cat on
12-20-2008
|
|
fiogf49gjkf0d decoud ,
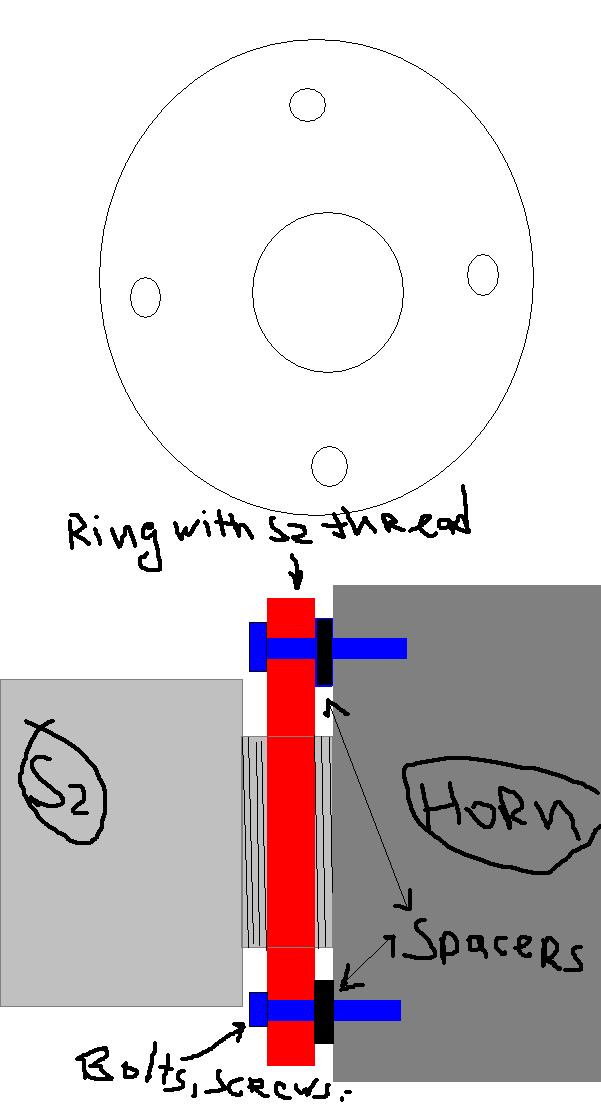
If you wish you might use my method that I “invented” or my Fundamental Chanel. My MF Chanel horn uses a sophisticated harness with centering functionality but in but Fundamental Chanel uses a very simple “extended ring” method. It us chip, it would cost very little any machinist to do it. I think I paid $100 for a pair of rings. Lake the rings a half or 2/3 of the size of your S2 driver thread. All the rest is visible on the drawing belle. The only pain is to co-axis the horn and the driver… But wish you it to be the only pain you have.
The caT
|
|
|
|
Posted by RonyWeissman on
12-20-2008
|
|
fiogf49gjkf0d Hi, I did something like this but the ring that the S2 screws into is bolted directly onto the horn. I can easily change this, is there a reason to have the space?
R Weissman
|
|
|
|
Posted by i_should_coco on
12-20-2008
|
|
fiogf49gjkf0d I had some adapters made, exactly like Romy's. I found a local engineering company in the UK (Slough) to do mine for me. The price was GBP240 for 8 pieces as some friends wanted some also.
|
|
|
|
Posted by Romy the Cat on
12-20-2008
|
|
fiogf49gjkf0d The spacers are not necessary but I did not say how it shell be done but rather how I have done it. I question is how precise you would like to measure the S2 thread. The key is to press the drive to the body of the honor while you still have the threads lest. I personally found that to use a narrow ring and spacer is comfortable as I can see the end of the driver and how it touched the horn. As spacer I use a pile of gaskets form a hardware store, I think now I have 6 gaskets under each screw. BTW, if anyone know any interesting idea how with this free-placing mounting method to co-center the driver with horn’s hole then share it.
The Cat
|
|
|
|
Posted by decoud on
12-20-2008
|
|
fiogf49gjkf0d Many thanks to Romy and others for the suggestions. I_should_coco, would you mind sharing the name of the company that made your adapters for the benefit of those of us in the UK? I suppose they may still have your designs, which would make it easier....
Regarding centering: how about making the bolt holes on the ring oversize relative the bolt diameter so that there is some play in the position until the nuts are tightened? Obviously, one would have to have oversize spacers too.
|
|
|
|
Posted by i_should_coco on
12-20-2008
|
|
fiogf49gjkf0d Yes, the company that made mine is called "pulse racing" - http://www.pulse-racing.co.uk/ They're on Slough Trading Estate.
I gave them the details and also took an S2 in for them to measure. When they arrived they fitted absolutely perfectly, so I'd highly recommend them
Cheers,
Pete
|
|
|
|
Posted by decoud on
12-20-2008
|
|
fiogf49gjkf0d Very many thanks, Pete: I shall drop them a line. I don't suppose you have a reference number or something by which they could identify the job? If they have got a CAD file on it already there would be no need for them to do any more measurements....Best, d
|
|
|
|
Posted by Romy the Cat on
12-20-2008
|
|
fiogf49gjkf0d  decoud wrote: decoud wrote: | | Regarding centering: how about making the bolt holes on the ring oversize relative the bolt diameter so that there is some play in the position until the nuts are tightened? Obviously, one would have to have oversize spacers too. |
|
There are zillion way to make it centerable. The key is not to how to center the driver technical but how to know that it is centered. It might not be so simple as one might think. In 400Hz horn it possible to take bug screens and to touch the crack between driver and horn until it will be not sensible. Wherever it will be shell be somehow marked. A big question HOW. In 250Hz horn is it more complicated and my hands for instance cannot reach the throat and I was forced to take bug screens off, paint the side of the S2 flare with silver and to beam light into the horn. Still, to mark what the holed would be and how it will be drifted after you tight the bolts are kind of complicated. If a horn a machined made then the maker can put marks for mounting holes. In case the horn is “homemade” then be prepared that the throat will not be a perfect circle and you would need to find a compromise in the driver centering. For S2, for any MF drivers that shoot above 5-7kHz, the axis centering is very important…
The caT
|
|
|
|
Posted by i_should_coco on
12-20-2008
|
|
fiogf49gjkf0d | decoud wrote: | Very many thanks, Pete: I shall drop them a line. I don't suppose you have a reference number or something by which they could identify the job? If they have got a CAD file on it already there would be no need for them to do any more measurements....Best, d
|
|
Sadly not, I doubt they'd remember, it's quite a small operation. I just sent them some diagrams. If you PM me you e-mial, I can forward you my communications.
|
|
|
|
Posted by decoud on
12-21-2008
|
|
fiogf49gjkf0d Many thanks, Pete, my email is my username at boltblue.com
Romy, about the centering: if one casts the horns - as i propose to do, the accuracy will be close to that of the mould, which can be directly measured before the stuff is poured in. What kind of precision are we talking about here (for an MF horn), do you think? Better than 0.5mm?
|
|
|
|
Posted by jessie.dazzle on
03-21-2009
|
|
fiogf49gjkf0d For centering :
The thickness of the ring that clamps the "bug screens" is around 3mm; in other words, there is a very short (+-3mm deep) "horn" in front of the screen. This allows one to center the driver using a metal (or hard material) tube or plug of the same diameter (in my case, a large 1/2 drive socket, from a socket wrench, on a long extension) , inserted from the front of the horn. This will also stop any drift of the horn during tightening of the mounting flange bolts.
Getting adaptors made :
Pete, if you have trouble getting the adaptors made elsewhere, I can dig up the info of the guy who made mine. I don't remember the price, only that it was very reasonable. He does not work with CAD info, so I had to supply prints. I shall now attempt to post them (wish me luck; in the past this has never worked. One of the few uncivilized aspects of the Good Sound Club web site is an historic incompatibility with civilized browsers, making certain operations, such as the posting of image files, impossible via a Mac !!!).
Otherwise, I will post them once back at work where I have access to a PC.
jd*
|
|
|
|
Posted by jessie.dazzle on
03-21-2009
|
|
fiogf49gjkf0d Just realized that the drawing I attached was "dimensioned" in mm (this is why some of the numbers are carried out to four places after the decimal point). Here's the same drawing in inches.
jd*
|
|
|
|
Posted by decoud on
03-21-2009
|
|
fiogf49gjkf0d Thanks, Jessie; for the benefit of others here I can confirm pulse-racing are excellent, just as Pete found. They still have his CAD file, so if you are happy with the bolt placement no need even to send them a drawing.
What is definitely not excellent, as often lamented on this site, is the options for horn manufacture. Jessie, I do wish you commercialized your technology....
|
|
|
|
Posted by jessie.dazzle on
03-21-2009
|
|
fiogf49gjkf0d And here is an image showing the driver in the mounting plate (still unable to upload the images; can only include them as attachments. Also, I have to do this one image per post).
Threading on the S2 does not go all the way to the tip of the driver, hence, using of an adaptor made from material having a thickness greater then 10mm is a waste. In the attached image, the shiney ring on the driver's "nose" is the part that has no threading. It is slightly smaller than the threaded part. If having horns machined from a hard material, it would be smart to make use this feature as originally intended; that is to say, as a centering aid.
jd*
|
|